The Definitive Certified LabVIEW Developer (CLD) Exam Prep Guide: Mastering the Standard for US Engineers
1. Introduction: The Benchmark of Engineering Excellence
In the high-stakes environments of the U.S. aerospace, defense, and automotive sectors, the demand for precision, reliability, and architectural scalability in automated test and control systems has never been higher. As industries transition toward complex electrified drivetrains, autonomous flight systems, and fusion energy research, the role of a Certified LabVIEW Developer (CLD) has become a critical benchmark for engineering excellence.
For senior engineering roles within the United States, this credential is more than a validation of coding proficiency; it serves as a definitive testament to a professional's ability to design functional, well-documented, and maintainable software architectures that adhere to rigorous industry standards. In an era where software failure can lead to catastrophic hardware loss or mission abortion, the "it works on my machine" mentality is obsolete.
In the aerospace sector, where mission-critical systems leave no room for error, and in the automotive industry, where rapid prototyping and hardware-in-the-loop (HIL) testing are essential for market speed, the Certified LabVIEW Developer designation provides a sharp competitive edge. It assures stakeholders—from Project Managers at NASA to Quality Assurance leads at Tesla—that a senior engineer can effectively manage the software lifecycle, minimize technical debt, and lead cross-functional teams. As organizations like Boeing, Lockheed Martin, and Ford continue to push the boundaries of integrated hardware-software systems, the CLD credential remains a vital pillar for those overseeing the complex instrumentation and data acquisition frameworks that define modern American engineering.
This comprehensive guide is designed to navigate the complexities of the CLD exam, offering strategic insights, architectural advice, and specific methodologies to ensure success in the 2026 landscape.
2. Logistics and Examination Environment
Understanding the operational constraints of the exam is as vital as knowing the G programming language itself. The Certified LabVIEW Developer exam is a test of endurance and resource management as much as it is a test of coding skill.
2.1 Exam Format and Duration
The examination is delivered as a rigorous 4-hour, performance-based practical assessment. Unlike the Associate-level exam (CLAD), which relies on multiple-choice questions, the CLD requires candidates to develop, debug, and implement a fully functioning software solution based on a specific prompt (e.g., a boiler controller, an ATM, or a traffic light system).
The exam measures technical proficiency through active application development. Candidates must interpret a specification document and translate it into working code that handles user inputs, automated timing sequences, and file I/O operations simultaneously.
2.2 The Transition to Pearson VUE
The certification landscape is undergoing a significant logistical shift. Effective through March 2025, exams will continue to be administered via existing online proctoring platforms. However, starting April 1, 2025, all practical examinations for the Certified LabVIEW Developer credential will transition exclusively to Pearson VUE authorized testing centers across the United States.
This transition is designed to standardize the testing environment, providing candidates with verified hardware configurations (dual monitors are standard in many centers) and professional on-site proctoring. This eliminates the common "home setup" variables such as internet instability or background noise. Candidates scheduling exams for dates beyond March 31, 2025, must select a Pearson VUE location during the registration process.
2.3 Software and Development Environment specs
The examination environment is strictly standardized to ensure fairness. As of 2026, the environment is standardized on LabVIEW 2024 Q3. The virtual desktop provided includes:
LabVIEW 2024 Q3 Professional Development System: Full access to the palette. NI-DAQmx and Hardware Drivers: Pre-installed for simulation purposes. VI Analyzer: A critical tool for self-checking code style before submission. Project Documentation: PDF readers to view the requirements. Crucial Note: No external libraries, plugins (like OpenG), or physical hardware may be introduced. You cannot bring your own "Quick Drop" keyboard shortcuts or templates. You must be proficient in building your architecture from a blank slate using only native LabVIEW functions.
3. Prerequisites and the Professional Gap
The gap between a casual LabVIEW user and a Certified LabVIEW Developer is substantial. It represents the shift from "hacking code until it works" to "engineering software that lasts."
3.1 The CLAD Prerequisite
The foundational requirement for advancing toward professional-level LabVIEW certification is the Certified LabVIEW Associate Developer (CLAD) credential. The CLAD serves as the entry-level benchmark, validating a candidate's broad understanding of the LabVIEW environment, core VI (Virtual Instrument) functions, and standard troubleshooting techniques. You cannot sit for the CLD without a valid CLAD.
3.2 Experience Requirements and The "Project Mindset"
To successfully navigate the transition from an associate to a professional developer, specific experience thresholds are recommended. NI suggests 12 to 24 months of full-time development, but the quality of that time matters more than the duration.
State Machine Mastery: You must be able to write a Standard State Machine in your sleep. Data Structure Design: Experience creating custom Type Definitions (TypeDefs) to manage system data is non-negotiable. Parallel Loops: You must understand how to run a user interface loop parallel to a data acquisition loop without causing race conditions. Hardware Integration: While the exam is simulated, hands-on experience with NI hardware (cRIO, PXI) helps in understanding why timing constraints exist in the exam prompts.
3.3 Salary Data & Market Trends (US-Specific)
The demand for certified LabVIEW professionals remains robust. In the United States, the CLD certification acts as a salary multiplier, often distinguishing Senior Test Engineers from mid-level staff.
National Average: The median salary for LabVIEW-certified engineers in the U.S. ranges from $98,000 to $125,000 annually. High-Cost of Living Hubs: Silicon Valley / Bay Area: $130,000 – $165,000 (Focus on EV and Consumer Electronics). Boston / New York: $110,000 – $145,000 (Focus on Biotech and Robotics). Huntsville / DC Metro: $105,000 – $140,000 (Focus on Defense and Aerospace). Contracting Rates: Independent CLD contractors often command rates between $85 and $125 per hour, depending on clearance levels and specialized hardware knowledge.
4. The CLD Exam Syllabus: What You Actually Build
Unlike the Architect (CLA) exam, which focuses on project management and framework design, the Certified LabVIEW Developer exam focuses on the implementation of a single, self-contained application.
4.1 Core Competencies
The syllabus is practically oriented. You will likely be asked to build a machine controller. Common themes include:
User Interface (UI) Responsiveness: The UI must never freeze. Buttons must react immediately, even if the "machine" is in a wait state. Sequencing: Implementing a defined sequence of operations (e.g., Wash -> Rinse -> Dry). File I/O: Reading configuration files (typically .CSV or .INI) to load test parameters and logging data to disk during execution. Limit Testing: Comparing simulated analog inputs against defined thresholds to trigger alarms. Timer Management: Tracking elapsed time for specific steps and total process time.
4.2 The "Trap" of Requirements
The exam specification will contain contradictory or complex requirements designed to test your architectural choices.
The Emergency Stop: Almost every exam prompt includes an "Emergency Stop" or "Abort" function. This button must work instantly, regardless of what the machine is doing. If your code waits for a 5-second "process" to finish before stopping, you will fail the functionality section. Configuration Changes: You may be required to allow users to change settings while the machine is running. Your architecture must handle data updates safely.
5. The Grading Rubric: How to Score 75%
The final evaluation is objective and brutal. A minimum aggregate score of 75% is required. Understanding where points are lost is key to passing.
5.1 Functionality (50%)
This is the "make or break" section. If your application does not work, style points cannot save you.
The Critical Failure Rule: If the application crashes, hangs, or produces a "broken run arrow" at submission, it is an automatic fail. Requirement Coverage: Every bullet point in the requirements document is worth points. If the prompt asks for a "Pause" button and you forget it, you lose points. Edge Case Handling: What happens if the user clicks "Start" when the machine is already running? What happens if the file path for logging is invalid? Your code must handle these without generating default LabVIEW error dialogs.
5.2 Style and Organization (25%)
This is where the "Certified" part of the title comes in. You are being graded on your professionalism.
Wire Routing: Wires must be straight. Avoid overlapping wires or wires running behind structures. Use the "Clean Up Diagram" tool cautiously, as it often produces suboptimal routing; manual refinement is best. SubVI Granularity: Do not write a "monolithic" VI. Logic should be encapsulated in SubVIs with meaningful icons. Labeling: All constants on the block diagram (timers, thresholds) must have visible labels. Magic numbers (unlabeled constants) are penalized.
5.3 Documentation (25%)
You must explain your code to the examiner.
Tip Strips: Every control on the front panel needs a Tip Strip explaining its function. VI Properties: The detailed help for the VI must be filled out. Block Diagram Comments: Use free labels to explain algorithms, not just describe what a function does. (e.g., "Calculate moving average to filter noise" is better than "Mean function"). State Documentation: If using a State Machine, comment on what happens in each state.
6. Architecture Selection: The Strategic Choice
Choosing the correct design pattern is the single most critical decision you will make in the first 15 minutes of the Certified LabVIEW Developer exam.
6.1 State Machine (The Safety Net)
The Standard State Machine is a single-loop architecture using a Case Structure inside a While Loop, with a Shift Register carrying the "Next State."
Pros: Extremely fast to implement; very easy to debug; perfect for sequential tasks. Cons: "Blocking" nature. If a state takes 5 seconds to execute, the UI is frozen for 5 seconds. Verdict: Use this ONLY if the exam prompt is very simple and does not require complex parallel monitoring.
6.2 Queued Message Handler (The Professional Standard)
The QMH is the gold standard for the CLD. It consists of an Event Handling Loop (Producer) and a Message Handling Loop (Consumer) connected by a Queue.
Why it Wins: Responsiveness: The UI loop (Event structure) is never blocked by the processing loop. The "E-Stop" works instantly. Buffering: If the user clicks faster than the machine can process, the queue buffers the commands. Scalability: It is easy to add a third loop (e.g., for Data Logging) that reads from the same data source. The "State" Hybrid: The best approach is often a QMH where the Consumer Loop contains a State Machine. The Queue drives the high-level transitions (Start, Stop, Exit), while the internal State Machine handles the step-by-step logic (Fill, Heat, Drain).
6.3 Functional Global Variables (FGVs)
To share data between your loops (e.g., the current temperature or the stop status), avoid Local Variables, which cause race conditions. Instead, use an FGV (Action Engine). An FGV is a non-reentrant SubVI with a simplified state machine (Read, Write, Init) that stores data in uninitialized shift registers. This is a "best practice" that examiners love to see.
7. A Time Management Strategy for 4 Hours
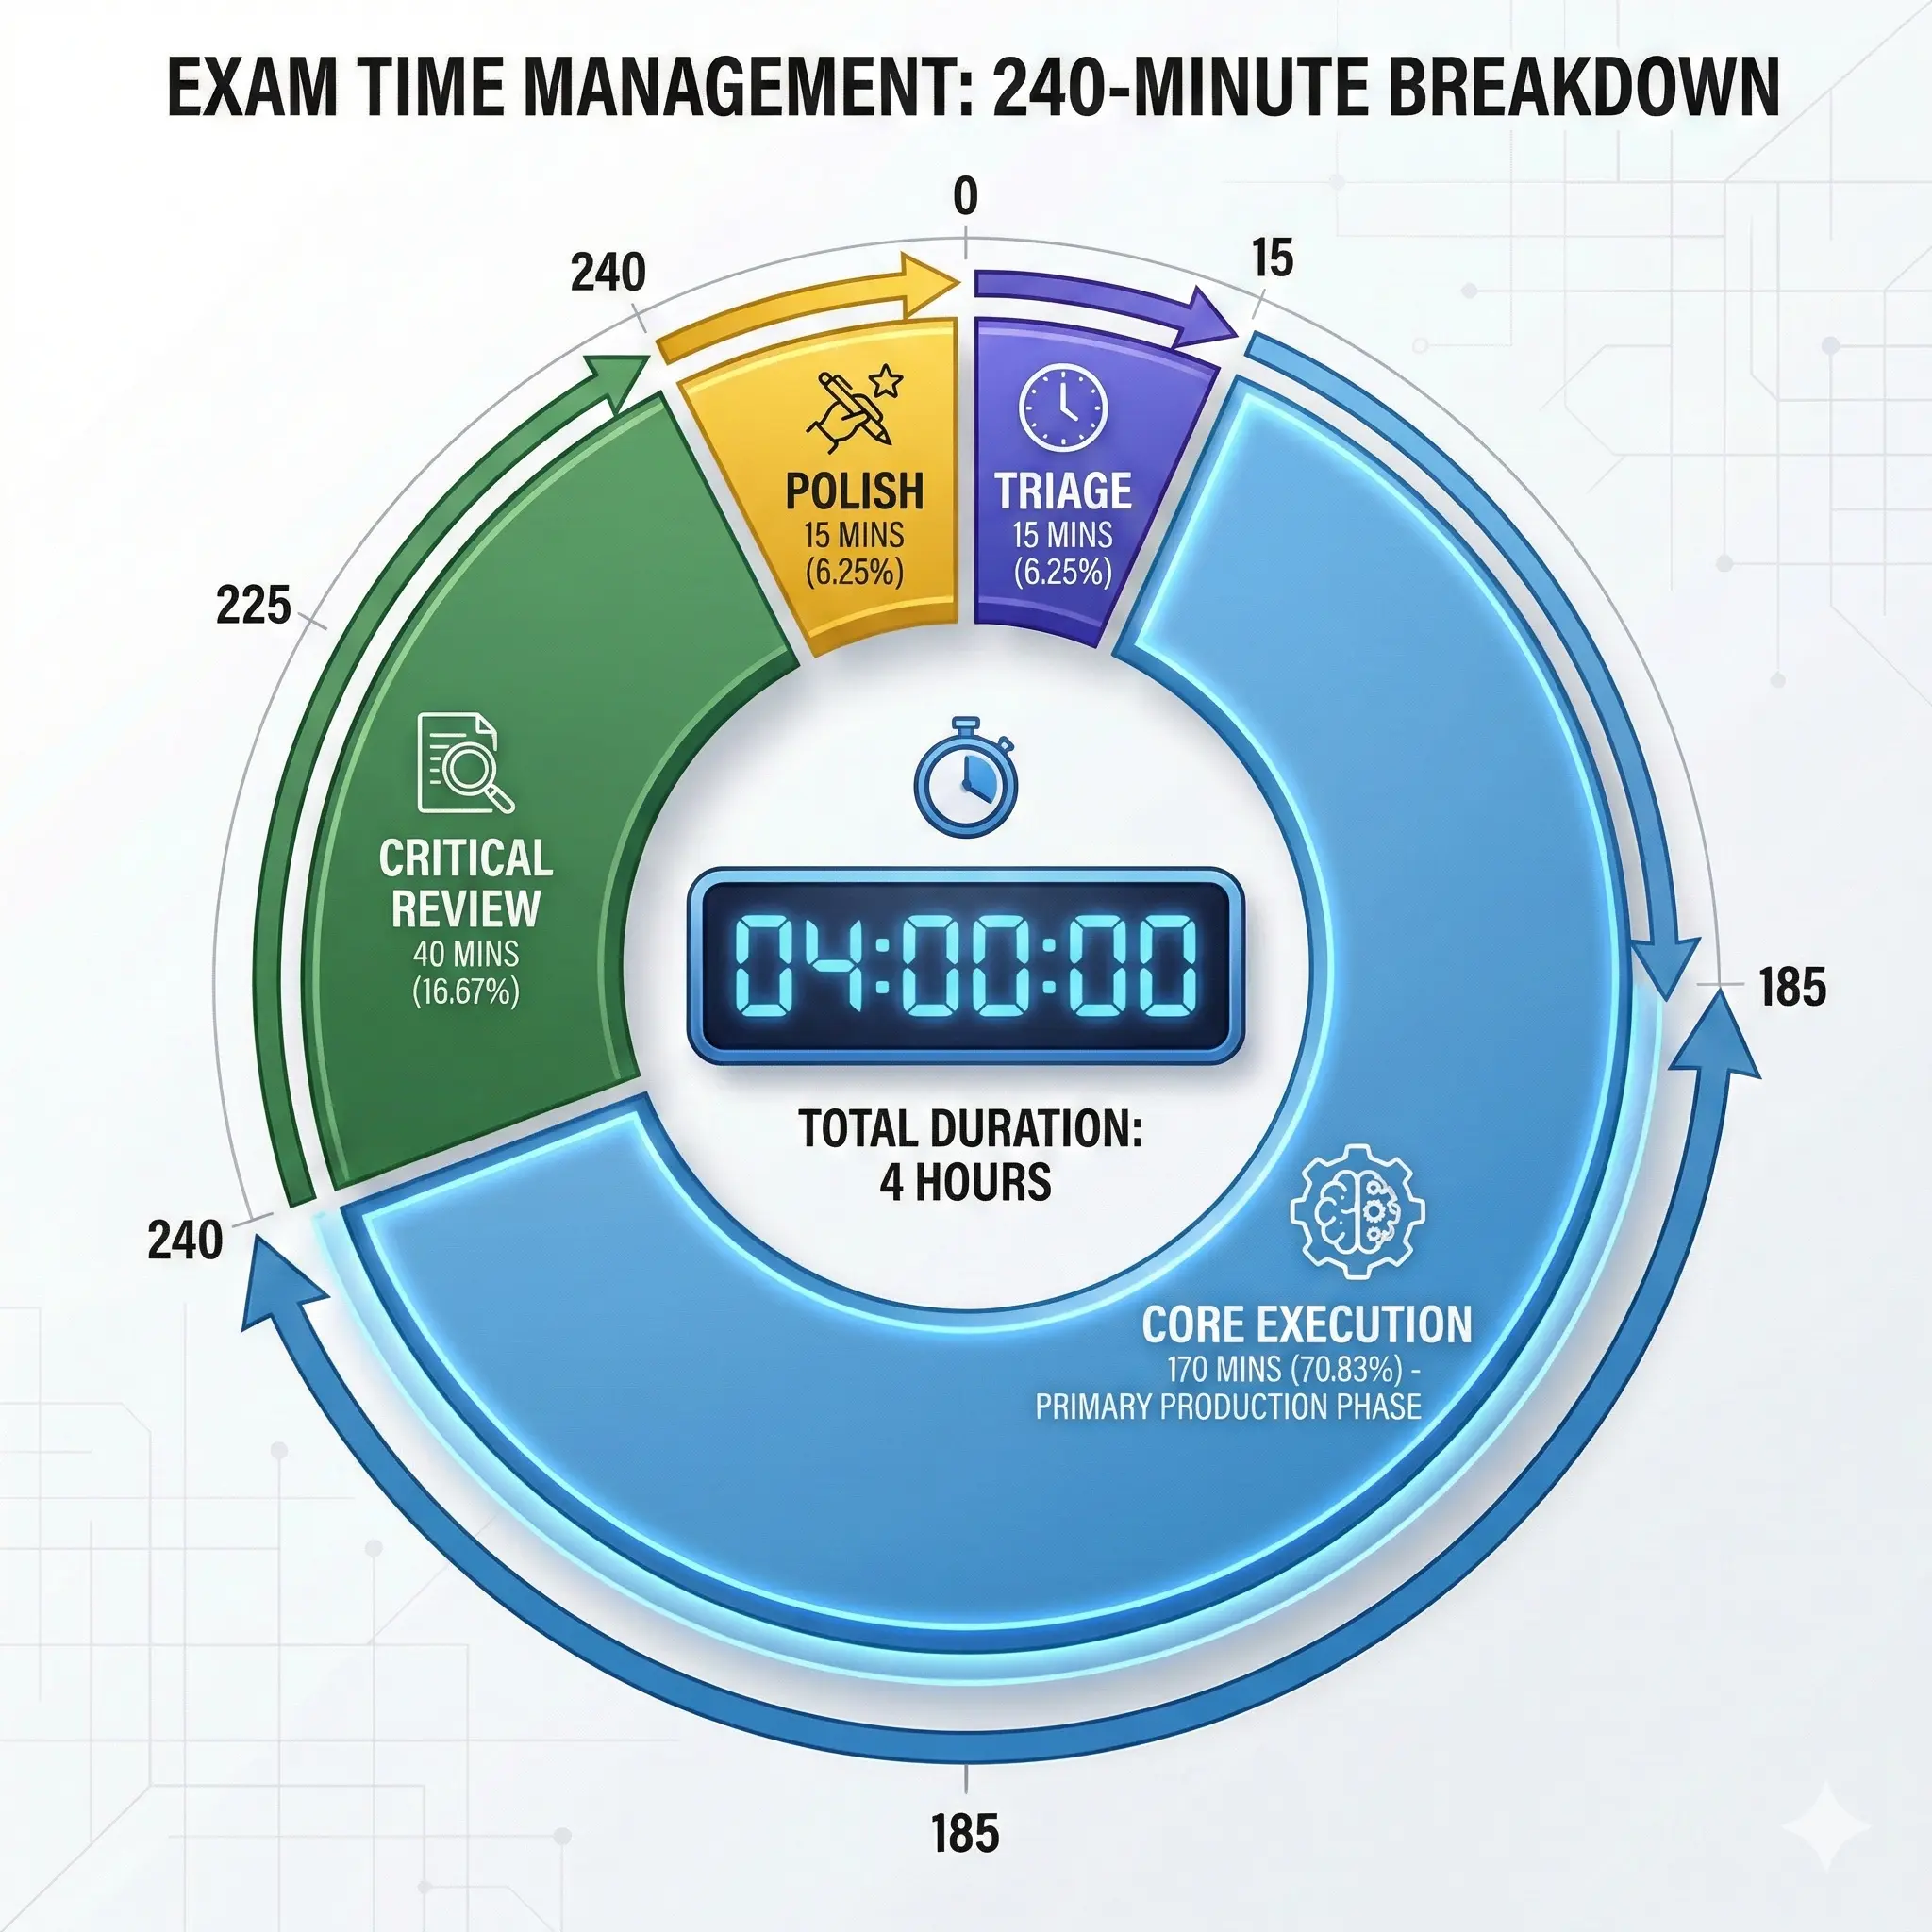
The CLD is a race. You have 240 minutes. Minute-by-minute discipline is required.
Phase 1: Planning (0:00 – 0:20)
Do not touch the mouse. Read the requirements document twice. Sketch the State Diagram on the provided laminated paper. Identify states (Idle, Initialize, Run, Error). Identify all inputs (Controls) and outputs (Indicators). Outcome: A clear mental map of the system.
Phase 2: The Framework (0:20 – 1:00)
Create the Project (.lvproj). Create the Main VI. Drop your design pattern (QMH). Create the TypeDef for your states (Enum). Create the Front Panel controls based on the requirements. Do not make it pretty yet; make it complete. Outcome: A running VI that does nothing but switch states without errors.
Phase 3: Implementation (1:00 – 3:00)
Implement the features in order of difficulty. Start with "Initialize" and "Exit." Build the core logic (the main sequence). Implement the File I/O (this usually takes the most time). Implement the Timer logic. Outcome: A functional application that meets 80-90% of requirements.
Phase 4: Refinement and Documentation (3:00 – 3:45)
Code Review: Straighten wires. Create SubVIs for cluttered areas. Documentation: Add Tip Strips, VI descriptions, and code comments. Icon Editor: Create basic text icons for your SubVIs (no default icons!).
Phase 5: Final Verification (3:45 – 4:00)
Run the "VI Analyzer" if available/time permits. Test the "Abort" button one last time. Verify all files are saved in the correct submission folder.
8. Professional Coding Style & Best Practices
The Certified LabVIEW Developer exam is not just about making it work; it is about proving you can write code that others can maintain.
8.1 SubVI Architecture
4-2-2-4 Connector Pane: Always use the standard connector pane pattern (Error In/Out at the bottom corners). Error Propagation: The "Golden Wire" (Error Cluster) must run through every single node. If a SubVI errors out, the rest of the code should generally bypass execution. Icons: Use text-based icons. If a SubVI calculates a limit, the icon should read "CALC LIMIT" in big, bold letters.
8.2 Type Definitions (TypeDefs)
You must use TypeDefs for your State Enums and your Data Clusters.
Strict vs. Standard: Use "Strict Type Def" for UI controls that need consistent cosmetic appearance. Use standard "Type Def" for Enums and Clusters. The Update Rule: If you add a state to your machine, you should only have to update the TypeDef, and it should propagate to all case structures. If you don't use TypeDefs, you will waste valuable exam time manually updating every instance.
8.3 The "Clean" Block Diagram
Left-to-Right Flow: Data should flow like a river. Avoid feedback nodes that send wires backward unless absolutely necessary. Size Limits: If your block diagram requires scrolling on a 1080p monitor, it is too big. SubVI it immediately. Coercion Dots: Eliminate red coercion dots (especially on Enums) as they indicate memory allocation and potential bugs.
9. Troubleshooting and Common Pitfalls
Even experienced engineers fail the CLD. Here is why.
9.1 The "Race Condition" Trap
Using Local Variables to pass data between parallel loops is the most common cause of failure. If Loop A writes to a variable and Loop B reads it, you cannot guarantee when that happens.
Solution: Use Queues, Notifiers, or User Events for synchronization. Use FGVs for data storage.
9.2 The "Unresponsive UI" Fail
If you place a Wait (ms) function of 5000ms inside your user interface loop to simulate a delay, the exam is over. You have failed.
Solution: Use the "Elapsed Time" Express VI or manual timestamp comparison (Get Date/Time in Seconds) inside a state machine that loops rapidly (e.g., every 100ms). This allows the UI to remain responsive while "waiting."
9.3 Over-Engineering
Do not build a generic "Plugin Architecture" or a "Hardware Abstraction Layer" (HAL) for the CLD. You do not have time. Build exactly what is asked for—no more, no less. The goal is a working boiler controller, not a scalable framework for all future boilers.
10. Study Resources and Preparation
Preparation for the Certified LabVIEW Developer exam requires a mix of official training and community engagement.
10.1 Official NI Training
LabVIEW Core 3: This is the most relevant course. It teaches the design patterns and error handling strategies required for the CLD. The CLD Success Package: NI provides a "Success Package" containing sample exams (ATM, Sprinkler, Car Wash). Do these exams. Time yourself. If you cannot finish the "ATM" practice exam in 3.5 hours at home, you are not ready for the real thing.
10.2 Community Resources
LAVA Forums: The "LabVIEW Advanced Virtual Architects" forums are an excellent place to see high-level code critiques. NI Community Daily Exercises: Look for "CLD-style" coding challenges that force you to solve small logic problems quickly.
11. Conclusion
Earning the Certified LabVIEW Developer credential is a significant milestone in an American engineer's career. It distinguishes the hobbyist from the professional and serves as a passport to high-level projects in sectors critical to the national interest.
By mastering the Queue Message Handler pattern, adhering to strict style guidelines, and managing your exam time with military precision, you can navigate the 4-hour challenge successfully. Remember: The exam does not test your ability to memorize functions; it tests your ability to engineer a robust solution under pressure.
Prepare your environment, practice your TypeDefs, and approach the exam with the confidence of an architect. Good luck.
Frequently Asked Questions (FAQ)
Q: Is the CLD exam open book?
A: No. You cannot use the internet, personal notes, or books. However, you have full access to the built-in LabVIEW Help and the Example Finder. Knowing how to search the Example Finder efficiently is a "legal cheat code" during the exam.
Q: Can I use Quick Drop shortcuts?
A: You can use the standard Ctrl+Space Quick Drop, but you generally cannot import your own custom keyboard shortcuts or Quick Drop plugins, as the exam is on a hosted virtual machine.
Q: How is the score calculated if I finish early?
A: There are no bonus points for finishing early. Use every remaining minute to improve documentation and code aesthetics (straightening wires, aligning controls).
Q: What happens if I fail?
A: You will receive a score report breaking down your performance by section. You must wait a mandatory cooling-off period (usually 2-3 months) before retaking the exam. Use this time to address the specific weaknesses identified in the report.
Q: Does the CLD expire?
A: Yes. The CLD is valid for 3 years. You must recertify by either retaking the CLD exam, passing the Certified LabVIEW Architect (CLA) exam, or earning recertification points through professional activities.